Showing posts with label Crafty Kids. Show all posts

Friday, December 20, 2013

All You Want for Christmas is 5 Bean Soup (We hope!)

All You Want for Christmas is 5-Bean Soup 

(We hope!)


Hooray for the holidays! We love this time of year in our house: the decorations, the holiday music, the celebrating and the gift-giving! Every year I pick out a craft for the kids to make that they can, in turn, give as a gift to loved ones. This time of year can easily be mistaken as the season of receiving instead of the season of giving. I always hope that by maintaining this tradition where the kids craft something themselves to give to others, that they might carry the message of GIVING in the hearts long after the holidays are over. 

In the past, I have had each child work on their own craft. This year I decided to try something new and had everyone work on one joint gift. While searching for a good combined-effort venture I found the perfect one on Cassie Johnston's awesome blog, Back to Her Roots. She had a great, easy to follow plan for a handmade holiday gift of Vegetarian 5-Bean Soup, perfect for holiday giving. Click here for the post on her blog for this project. It is great! 

It was a lot of fun to do as a group, lots of laughs and lots of fun. I doubled the recipe to make twice as many jars of soup mix than Cassie's original post called for. When we were done, we were out of breath from laughing and had a bunch of gifts for all our loved ones. I was more than happy! 


There are two parts to the prep: layering the dried beans in the mason jars and mixing & measuring out the spice packets. We began with just the dried bean portion of the project. Before I brought the kids on the scene, I set up a sample of what the beans would look like layered, made a makeshift funnel out of card stock and separated the beans for everyone. 


We moved along, assembly-line style. Each older was in charge of two different beans. 


Baby Sister was in charge of just one type of bean. This was plenty because we quickly  discovered she preferred to put the beans in one at a time. 


Next I measured and mixed a spice mixture. The olders worked together to place two bay leaves into the spice pack and then scoop 3 tablespoons of the mix for each soup jar. 


We modified the original directions a bit here, too. We swapped out parchment paper for plastic wrap. It was just easier for the kids to twist and tie to create the spice packet. 


I wrote out the instructions (although the website provides printable labels which is pretty awesome) and the kids decorated the labels. We tied the directions to the jars with simple string and voila! A handmade gift made by all three kiddies! 

So, if you are in need of a homemade gift idea for the kiddies or even for yourself, this one will work for sure! It was so much fun to do as a group and the results included fun family time and cute gifts for the babes to share. I hope you have fun with this as well! 


Thank you for reading and happy holidays!!! 

Thursday, November 21, 2013

It's TURKEY TIME!!

It's TURKEY TIME!! 


If you have a couple of paper plates, a toilet paper roll, construction paper, markers and crayons, you can set the kids to task making this adorable turkey. This one was made by my 4-year-old. He is pretty proud of this guy!  So proud that this turkey might be gracing our Thanksgiving table this year. Too cute! 


To begin, we colored the big feathers on a half of paper plate. Look how focused!!!


Then we traced the shape of our feet.


We cut out our outlines, then decorated and colored the turkey's body. 


And decorated some more.


Then I glued the bodies to toilet paper rolls and stapled the rolls to the paper plate feathers. Instant cuteness! This one is by my littlest. You can make out the outline of her tootsy toes on the bottom of  her turkey. That was her favorite part, having her foot traced! 


These are super easy and a fun craft for the days leading up to and even on Thanksgiving Day! I hope you enjoy a wonderful holiday and I look forward to seeing you back here soon! 

Thank you for reading! 


Thursday, September 19, 2013

Finger Painting Fall

Finger Painting Fall


Hooray for Fall! A great way to celebrate the changing of the seasons is with an easy fingerpaintng project.  


Here is a list of things I get together before I begin:

  • plastic tablecloth
  • card stock
  • finger paints
  • paper plate (great for easy cleanup)
  • smocks
  • baby wipes
  • have a place designated for where wet artwork is going to sit to dry
  • for the more enthusiastic kids, have a tub ready and waiting... just in case


To set up this project, I grab a plastic tablecloth left over from a recent family party or the few I have on standby from a local dollar store. I put some fall color fingerpaints on a disposable paper plate for easy cleanup. I also made a simple tree outline on card stock. You don't have to use card stock but I find it holds up best to almost anything. I pull back everyone's hair. Yes, even my own. Then get the smocks on.  All that is left after that is to let the artists do their thing! For this project, Little Sister invited her cousin in on the fun. 


While Little Sister was creating her fall leaves, I am repeating the name of the color she is painting with to help her make the connection to colors and their names.


Can you tell she kind of enjoys art time?  (Her cousin, it turns out, DESPISES the feel of finger paints and happily watched from 6 feet back. Too cute!) 


Little Sister loves this and any finger painting project. And the results are totally worth a prime spot on the fridge.

HAPPY FALL, Y'ALL! Thank you for reading!


Friday, June 14, 2013

Camping themed activities


Camping-themed Activities

Whether you are planning a family camping trip with your little one or maybe just planning some indoor camping-themed fun, these fun projects will put the kiddies in an outdoor frame of mind!  


Handprint Campfire:

This activity is perfect for your youngest campers. I saw this on Pinterest and knew it was a perfect project for my one year old who has come to LOVE creating with finger paints. 


  To set up, I cut out the logs and glued them to a separate piece of construction paper. I prepped the red, orange and yellow paints. Once I was ready to begin, I actually painted Little Sister's hand using red and orange on the palm of her hand and then yellow on her fingers. 


Once I showed her where to put her hand, she went right to work slapping her hand on the paper. She LOVES to do this so there wasn't much effort in getting her to do it. However, if your little one is unfamiliar with finger painting, nothing wrong with helping them press their hand in the right spot on the page. 

Once she was finished and Little SIster promptly got her hand washed, I showed her the picture she created. I excitedly talked about the campfire and about it being hot and bright. I would like to think she was pretty proud of her art.  


Painting a Forest:


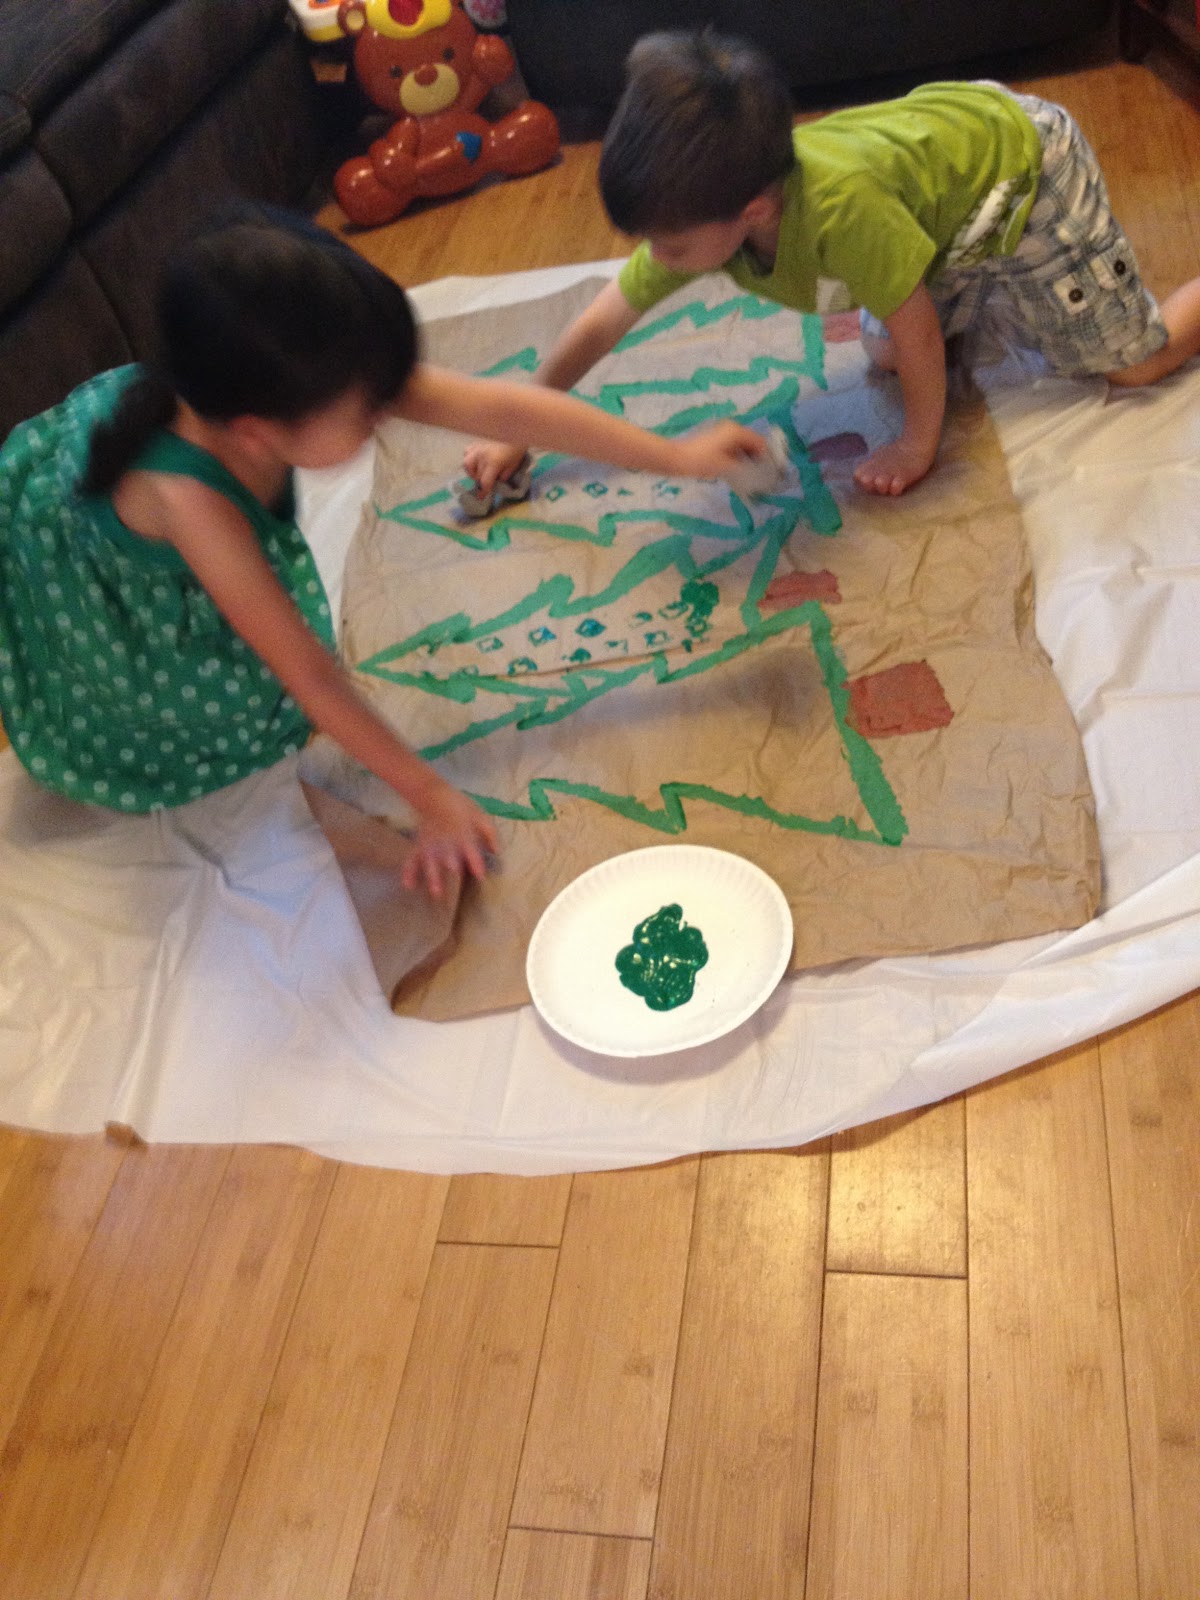
 This project is really fun because the children get to create some HUGE pictures, almost as tall as they are, and I use some non-typical painting tools. You can use a big piece of butcher block paper or do what I did. Sometimes packages that get delivered to the house are packed with giant pieces of brown paper to fill the empty space. I always flatten those out and save them for a fun project like this. 


The night before I painted the outlines of all the trees and the tree trunks. I do this so that the project doesn't take really long. However for children 4 and up, I would just create the outline. 


 The day of the project I gathered pieces of a cut-up egg cartons, tempera paint for the olders and finger paint for the youngest in our mob. 


The olders dipped the pieces of egg cartons into the paint and stamped the trees to color them in.


 The baby used finger paints. 


They used a little teamwork to finish things up.  :)


The finished products are really neat. They take up almost the entire space of our staircase landing. They are serving as beautiful backdrops to many other camping projects the kids have created. 


Nature Painting


My kiddies LOVE to paint. Who doesn't? Here I am hoping they can recreate a scene from their natural world on paper. 


                                                                                                                                                To begin, we looked through a few books to talk about what the setting in the forest
looks like (grass, leaves, trees, bushes, etc) and what animals live there. 

(Yes, you are correct. The title of that book is, indeed, "Who Pooped in the Park?")


I mixed a few shades of the more common colors we decided we would need, green and brown. The kiddies also had black, blue, yellow, red but in smaller cups in order to encourage the use of the green and browns in the larger cups. You might not decide to do this. I did it in order to sway the children's paintings to be more realistic. 


I then let the olders have at the paint. Here Big SIster is working on what looks like a Weeping Willow. 


Brother made this one. It is a picture of our orange tent (how accurate!), a tree and 3 animals: a squirrel, a blue jay and a rattle snake, complete with rattle. 


Big SIster created this work of art. It is a bear who is "thinking about eating the berries in these trees." Awesome!  


Make Your Own Trail Map


The olders have seen their fair share of trail maps. They are starting to become familiar with symbols, the legend and directions. These "make your own" versions are a great way to re-enforce some of the things they already know about trail maps. I found these awesome stickers of trail signs and symbols to go with this project. 


Very hard at work! They used different colors to indicate different trails on their maps. 


The final products, complete with mountain ranges, forests, bike trails and camp sites.  


These are some of the projects I have done with my children as a way to excite and motivate them about an upcoming camping trip, but, like I mentioned before, you could use these activities to have an indoor camping adventure right in your own home, complete with sleeping bags and oven-baked s'mores. How ever you use any of these projects, I truly hope you enjoy. And very importantly, thank you so much for reading! 


Monday, March 18, 2013

Easter Egg Painting with Baby

Easter Egg Painting with Baby


Its the time of year to start making Spring crafts. You might have some cute bunnies and fluffy chicks in the works. We have been busy making daffodils out of egg cartons, butterflies out of toilet paper rolls and finger-painted inchworms. But all of those crafts are really appropriate for Big SIster and Brother, not so much for Little SIster who hasn't turned one year old just yet. This is a simple craft that she can do and really enjoy. Plus, it might make a cute little gift to some lucky grandparents!  :)


To begin with, I made a few card stock cutouts of eggs. I ran a bath for the baby prior to beginning. I run it slightly warmer than normal when we do something like this so that by the time the craft is over it is juuuuuust right.  :) I sat the baby in her high chair in her diaper and gave her the first cutout. Then I just add one color at a time to her cutout and leave the design up to her.  When she has had enough I simply pop her into the tub and wipe up the paints. 


MASTERPIECES! 

Happy Spring everyone!!

Thursday, March 7, 2013

Cherry Blossoms


Cherry Blossoms


Another beautiful and early sign of Spring is the budding of the Cherry Blossoms. I showed my little ones images of cherry blossoms and then helped them get started on making their own cherry blossoms. 


While the kiddies were napping, I painted a handful of trees without blossoms. 


 Once everyone was up and at 'em, I popped some popcorn and squeezed a bunch of glue onto a paper plate for everyone to use. 


Making the blossoms was easy. We dunked a piece of popcorn in the glue and placed it on the tree. Once the artists felt like they had enough blossoms on their trees, we let them sit overnight to dry thoroughly. 


The next morning we used pink paint and dabbed each piece of popcorn with our paint brushes. Dabbing works much better than brushing it on because the popcorn is rather fragile. 


After that, we just needed to let our projects dry again and they were complete. :) 


Wednesday, March 6, 2013

Daffodil Craft


Daffodil Craft

Spring has sprung!


It is time to start gearing up for springtime! One of the earliest signs of Spring is the appearance of daffodils. We used egg cartons, construction paper and paint to make our own daffodils and get into a Spring-y feeling! 


To introduce this activity, I had the little ones check out a bunch of pictures of daffodils on my iPad. From there we talked about the colors we saw and how things begin to grow in the Springtime. Then it was time to make our own daffodils. 


I cut each individual egg section apart from an unused egg carton. The children simply painted the inside and outside of each soon-to-be-daffodil. 


Everyone got to do 4 or 5 egg carton sections so that there were enough to give away to loved ones. 


I love this activity because Little Sister can get in on the fun, too. She used fingerpaints on her flower. 


My little artistic genius hard at work. 


Busy hands make happy kids! Once all the yellow flowers were painted, we set them on newspaper to dry. We waited until the next day to move on to painting the stems and leaves, but you don't need to. 


Stems and leaves were a few simple strokes of green paint. I modeled one and then sent the kids to task. 


Looking at this picture makes me want to yell, "Where is his smock!?" Luckily, there were no accidents.  :)


Little SIster got in on this fun, too. I painted the stem of her daffodil and we used finger paints to make the leaves. After that, she used up the remaining paint to make her own unique picture. (BTW, despite the look on her face in this picture, Little Sister is always happy to finger paint. haha!) After our stems and leaves were dry, we glued a flower to each one. 


 Happy Spring, everyone!!!!