Sunday, June 23, 2013

Great American Backyard Campout, 2013

Great American Backyard Campout
Whether you are a seasoned camper or if this was your first camping experience, I hope you enjoyed the Great American Backyard Campout this weekend. I love the idea of using any activity or event to encourage children to be active outdoors so our family could not wait to participate. If you didn't participate this weekend, consider picking your own date and having a backyard campout whenever it works for you, especially as a way to introduce camping to your little ones. It is a great first camping experience for young campers and is great for the grown ups to have access to the house as a backup if things don't go as planned. :) 

We headed up to the Poconos, Pennsylvania for our backyard campout. We had big family cookout prior, so our day was full of tons of outdoor play, walks to the lake, tree-climbing, bubble blowing and sparklers! Not to mention lots and lots of great food. Our day couldn't have been more perfect.  Here are just a few pictures from our campout!


The tent was ready, we love our Big Agnes
Now to wear out our little campers!


Little Sister was very independent and wanted to make her own bubbles. 


Little Brother is sitting in the spot that used to hold my tree house when I was a little older than him. It has since rotted away and the branches have broken off  but I can remember it very clearly. 


Heading back from a walk to the lake, the Daddy found this baby snake. All the kids were amazed.  I swear you could see them just falling in love with nature! Our best guess is that it is the Northern Ringneck snake. Very cool. 


Brother is taking good care of Little Sister. And getting a workout. 


After a very full day, all 3 of our munchkins drifted off to sleep very easily. Here is Little Sister taking over Momma's mattress and sleeping bag.  


Big Sister and I were up pretty early but he Daddy, Brother and Little Sister slept in.  Who could blame them? The day before was spent with some of our nearest and dearest, playing, eating and lots of laughing. Our Great American Backyard Campout was a definite success! 


Thank you for reading! 

Wednesday, June 19, 2013

Food for Fuel


Food for Fuel

Ideas on what to bring on a hike to keep your little ones full of energy!

If you are heading outdoors and hitting the trails with your kiddies, here is a list of ideas of things you might bring to keep them fueled up!


For the babies:

  • Plenty of water or bottles

Roasted Sweet Potato cubes
  • sweet potato cubes

  • Cut up grapes

  • raisins

  • cooked veggies like peas and carrots

  • dry cereal 


For your toddlers and young children:


  • lots of water

Two bowls for my kids, ages 3 and 5;
one of fresh veggies, the other
is raisins, dried apricots and
almond slivers.
  • fresh cut up veggies like cucumbers, tomatoes and peppers

  • bowl of dried fruits and nuts

  • PB&J sandwich, or sun butter and jelly, or almond butter and honey.... you get the idea.

  • fresh fruit

  • granola bars


These are just a few ideas of what I might try to bring along on the day of an outdoor adventure. Sometimes one snack per kiddie is enough but if we are planning on being out for 2 or more miles, I tend to double up on snacks for everyone, even the grownups. 

Also, I try to be mindful to make a little bit of a bigger breakfast on the day of a hike and even give the mob a banana before we step onto the trail. Lots of times they make it through the trail without asking for a snack. If that is the case, we find a nice spot to sit after our trek is done and eat then or they chow down in the car ride home. But should they need something along the way, these are all pretty easy to eat ideas, no mess and nothing should get left behind. 


See you out there!  AND THANKS FOR READING!!!!  


Brother is having a snack break on the trail. All he needs is a log and an apple. 


Poison Ivy, Ticks and Bears, Oh my!


Poison Ivy, Ticks and Bears, Oh my! 


Ok, Ok. There weren't any bears. Well, no bears that we know of. We finally got to our first camping trip of the season and we did, something new for us, camp in "bear country". That meant we needed to take extra precautions to avoid inviting bears to our campsite. Like I said, we did not actually see any bears. Oh, wait. Except for that one very exciting moment when I made the entire family freeze in their tracks and "SHHHHH!" because I saw a bear cub. It was a very tense few moments before the Daddy pointed out that the bear cub was actually a ferrel black cat. Ah, well. So, in conclusion, no bear sightings. 


The weekend started off a little rough. Friday was a wash out due to heavy rain storms. We finally arrived at Stephen's State Park in Hackettown, NJ on Saturday at noon. Upon inspecting the campsite with my surprisingly keen eye for once, I spotted a bunch of poison ivy. Especially with our littlest camper running around, who is only 15 months old, we decided to find a new campsite. We loaded everyone back into the car and searched the campgrounds. We did find another great spot and by 1:30 we were finally unpacked and CAMPING! 


Our first order of business was to get to hiking. We decided to head to Saxton Falls. From our campsite, it was a little less than 2 miles to get to our destination. We figured we would mostly be walking along the river so the elevation changes wouldn't be drastic. We thought it might be a good idea to take the stroller for a change.  Well, that was a mistake. But the results were hysterical. 


There is a small part of the trail we hiked that is along the main road. That part was a little tricky with the whole mob in tow. However, once we got to the portion that led off the road, we could quickly put that behind us and focus on the gorgeous trail in front of us. It was a steep climb to the main trail. It had some tricky footing, steep declines on one side of the trail and sometimes even on both sides. It was an engaging path with a small creek on one side, lots of little creatures to see and a tricky little obstacle to climb through. (Yea, with a stroller.)  


Walking through woods and particularly tall grass can mean ticks. They are just a reality of being outdoors. Sure, they can give you the creeps but for the sake of the babes, its best to put on a brave face and shake it off should you spot them. After every hike and throughout a camping trip the Daddy and I stop and check the kiddies and ourselves for ticks. We carry needle-nose pliers in our backpacks because they are our favorite tick removal tool. We found a few over the 2 days we were away on this trip but our family policy is to remove them and move on. Done. If you and your family hit the trails, check out this helpful post about checking for ticks on trails.com


Ah, so, the obstacles. They can make a hike even more fun when you get to climb and crawl over them. However there was no way around these large, fallen trees branches in the path and with the stroller... well, we had a bit of a perplexing situation. But we solved it pretty quickly.  I crawled through and then the Daddy started passing kids through.


Then there was the business of getting the stroller through. Ha! Poor Daddy! 


We got to the Falls and hung out a bit, the kids were awestruck. They really enjoyed seeing Saxton Falls. But it wasn't long before we were heading back to our campsite with thoughts of a roaring campfire in our heads. 


No dinner tastes quite like a dinner cooked over a campfire and after working up a significant appetite, we were all looking forward to dinner!


I love watching the kids playing while we get the fire and food going. They love to investigate the natural world, make up games and collect treasures like cool rocks. They found and observed so many new bugs and spiders. But when dinner was ready, they didn't need to be called twice, they were hungry!


As you might imagine, no camping trip is complete without s'mores! The olders could not get enough! 


Despite the late start we all felt like we had a really full camping trip. We got in a great hike, had lots of fun play, made cool discoveries and some awesome family time. You know what? The kids are already asking about when we are camping again!!! 


THANKS FOR READING! 


Monday, June 17, 2013

What's in Your Backpack?


What's In Your Backpack?


When taking your crew out on a hike there are a lot of things to remember.  Are you remembering all of the things you might need?  I put together this checklist to help you make sure you have all the essentials covered. Then you can relax and just focus on having a great hike! 


Some items that might make up your first aid gear on a hike. 


The Basics:

  • Water, water, water 

  • healthy snacks to refuel when energy gets low

  • sunscreen

  • bug spray

  • bandaids

  • antibiotic gel, like Neosporin

  • Tweezers, tick key, needle-nose pliers... some tick-removing tool

  • Maps, apps, compass, don't get lost! 

  • Watch the weather. You might want to bring rain gear including boots, raincoats or ponchos.
    The mob geocaching in the rain.
  • hand sanitizer

  • Children's pain reliever

  • Benendryl

  • fully charged cell phone

  • Sun hat, visor, sunglasses


If you are hiking with a baby:


  • bottles 

  • extra water

  • blanket(s), changing mat for diaper changes

  • diapers, wipes, rash cream

  • bug net if you have a stroller

  • toys that can be attached to the side of the stroller or carrier

  • if baby is too little for bug spray, dress your little one to cover as much skin as possible

  • sun hat for warm, sunny weather

  • extra hat and mittens in colder weather

  • dress baby in layers


If you want to go the extra mile, you could also bring:

  • change of clothes (My son is a puddle jumper! I have been grateful to have a change of clothes in the car more than once.)

  • flip flops for the car (Sometimes after a long hike, the kiddies are glad to kick off their hiking shoes and socks and let those little piggies breathe!)


  • Extra snacks for the ride home          

  • animal track guide

  • binoculars or magnifying glass

  • Scavenger hunt checklist


Friday, June 14, 2013

Camping themed activities


Camping-themed Activities

Whether you are planning a family camping trip with your little one or maybe just planning some indoor camping-themed fun, these fun projects will put the kiddies in an outdoor frame of mind!  


Handprint Campfire:

This activity is perfect for your youngest campers. I saw this on Pinterest and knew it was a perfect project for my one year old who has come to LOVE creating with finger paints. 


  To set up, I cut out the logs and glued them to a separate piece of construction paper. I prepped the red, orange and yellow paints. Once I was ready to begin, I actually painted Little Sister's hand using red and orange on the palm of her hand and then yellow on her fingers. 


Once I showed her where to put her hand, she went right to work slapping her hand on the paper. She LOVES to do this so there wasn't much effort in getting her to do it. However, if your little one is unfamiliar with finger painting, nothing wrong with helping them press their hand in the right spot on the page. 

Once she was finished and Little SIster promptly got her hand washed, I showed her the picture she created. I excitedly talked about the campfire and about it being hot and bright. I would like to think she was pretty proud of her art.  


Painting a Forest:


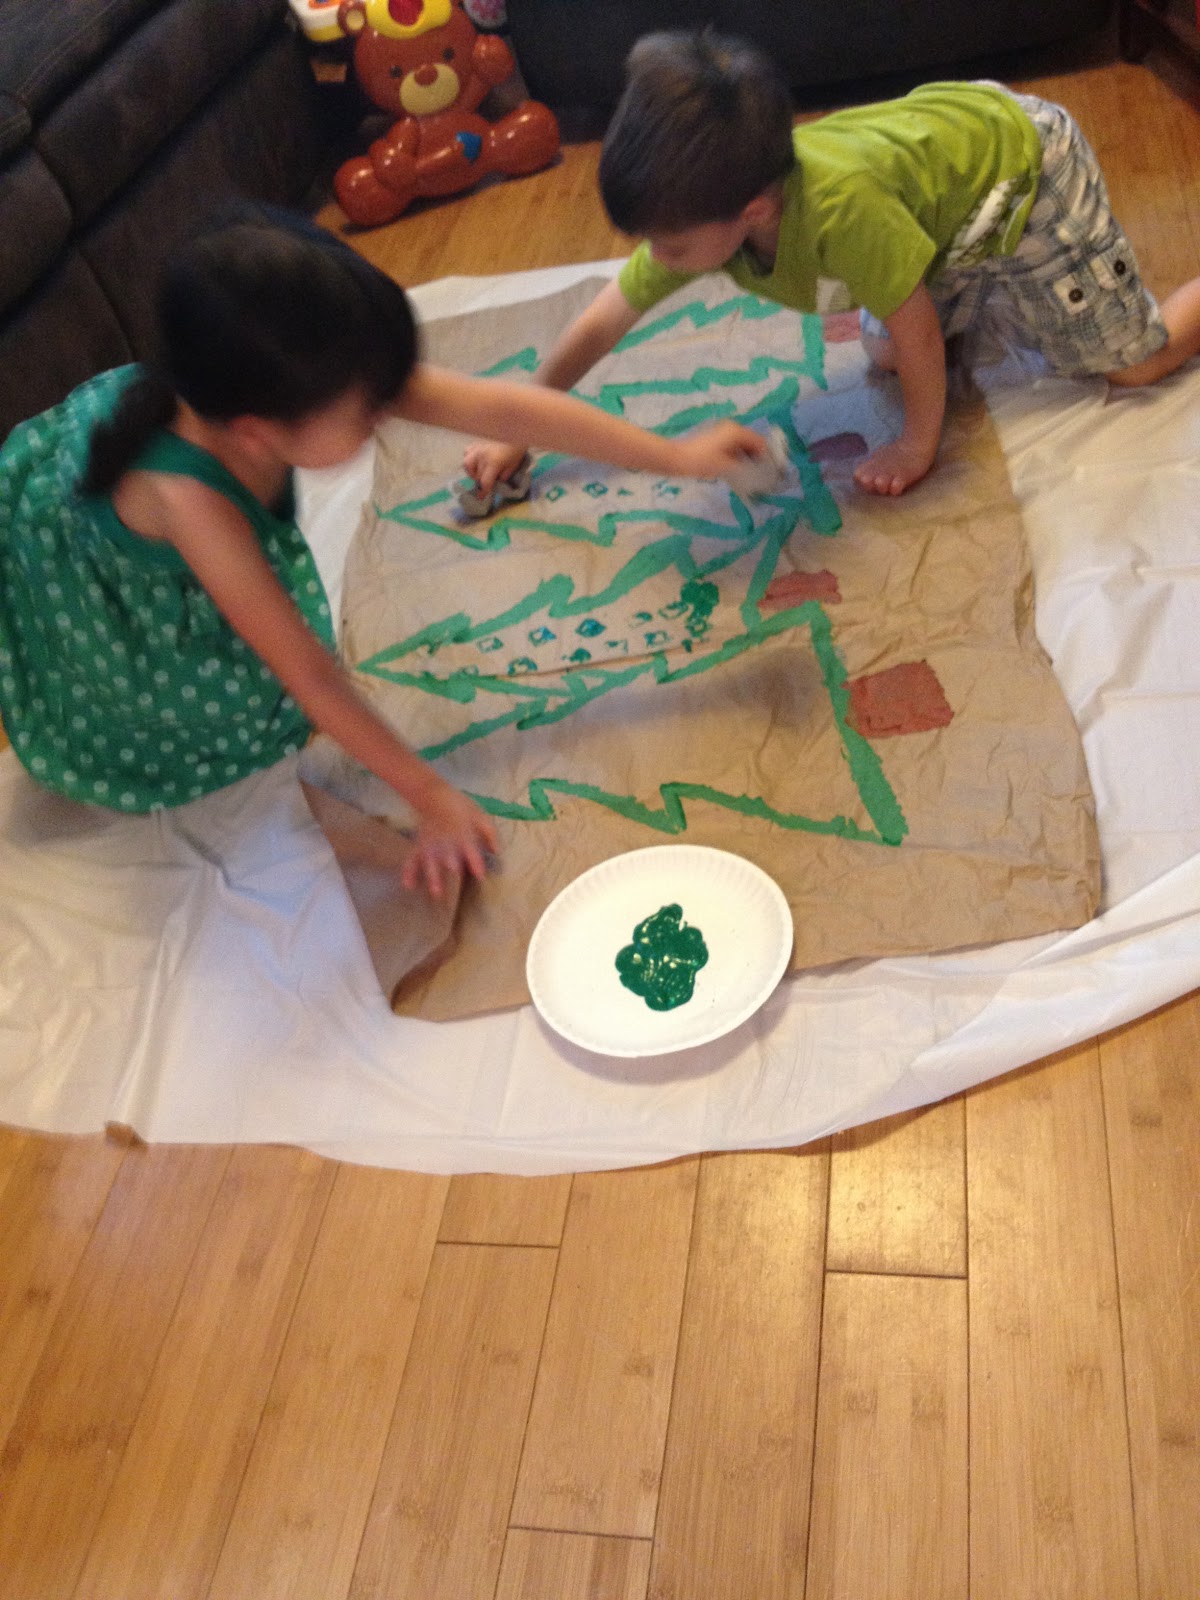
 This project is really fun because the children get to create some HUGE pictures, almost as tall as they are, and I use some non-typical painting tools. You can use a big piece of butcher block paper or do what I did. Sometimes packages that get delivered to the house are packed with giant pieces of brown paper to fill the empty space. I always flatten those out and save them for a fun project like this. 


The night before I painted the outlines of all the trees and the tree trunks. I do this so that the project doesn't take really long. However for children 4 and up, I would just create the outline. 


 The day of the project I gathered pieces of a cut-up egg cartons, tempera paint for the olders and finger paint for the youngest in our mob. 


The olders dipped the pieces of egg cartons into the paint and stamped the trees to color them in.


 The baby used finger paints. 


They used a little teamwork to finish things up.  :)


The finished products are really neat. They take up almost the entire space of our staircase landing. They are serving as beautiful backdrops to many other camping projects the kids have created. 


Nature Painting


My kiddies LOVE to paint. Who doesn't? Here I am hoping they can recreate a scene from their natural world on paper. 


                                                                                                                                                To begin, we looked through a few books to talk about what the setting in the forest
looks like (grass, leaves, trees, bushes, etc) and what animals live there. 

(Yes, you are correct. The title of that book is, indeed, "Who Pooped in the Park?")


I mixed a few shades of the more common colors we decided we would need, green and brown. The kiddies also had black, blue, yellow, red but in smaller cups in order to encourage the use of the green and browns in the larger cups. You might not decide to do this. I did it in order to sway the children's paintings to be more realistic. 


I then let the olders have at the paint. Here Big SIster is working on what looks like a Weeping Willow. 


Brother made this one. It is a picture of our orange tent (how accurate!), a tree and 3 animals: a squirrel, a blue jay and a rattle snake, complete with rattle. 


Big SIster created this work of art. It is a bear who is "thinking about eating the berries in these trees." Awesome!  


Make Your Own Trail Map


The olders have seen their fair share of trail maps. They are starting to become familiar with symbols, the legend and directions. These "make your own" versions are a great way to re-enforce some of the things they already know about trail maps. I found these awesome stickers of trail signs and symbols to go with this project. 


Very hard at work! They used different colors to indicate different trails on their maps. 


The final products, complete with mountain ranges, forests, bike trails and camp sites.  


These are some of the projects I have done with my children as a way to excite and motivate them about an upcoming camping trip, but, like I mentioned before, you could use these activities to have an indoor camping adventure right in your own home, complete with sleeping bags and oven-baked s'mores. How ever you use any of these projects, I truly hope you enjoy. And very importantly, thank you so much for reading! 


Wednesday, June 12, 2013

Chicken burgers with apple, maple and coconut


CHICKEN BURGERS WITH APPLE, MAPLE AND COCONUT


I had read a recipe recently that used ground chicken, apples and maple syrup and I was intrigued. Come on, that sounds so yummy! So I put a little Paleo twist on the idea and came up with these delicious burgers. I hope you like them! 


INGREDIENTS:

I lb of ground chicken
1/2 onion, diced
1 Granny Smith apple, shredded
2 Tbsp Maple syrup
1/3 cup of a combo of coconut flour and shredded coconut
1 egg
salt and pepper
coconut oil for cooking

And bacon! 
Do not forget the BACON! 6 slices should do it. 


1. In a pan, cook the bacon. Set it aside. 

2. Combine all the remaining ingredients except the oil needed for cooking. I use my hands and just get all that goodness mixed together. I find it helpful to keep the faucet lightly running so I can run my hands under the water. The mixture will be a little messy. 

3. Divide into 6 burgers. Heat the coconut oil in a pan and cook burgers until they are cooked thoroughly, somewhere in the 10-12 minute range. 

4. Serve each burger with a slice of bacon on top of it. Mmmm, the bacon ties it all together! 


Hope you enjoy and thank you for reading! 


Monday, June 10, 2013

Homemade book of found treasures

HOMEMADE BOOK of FOUND TREASURES

We are a family that likes to hike, camp and just generally be moving outdoors. So, we try to keep our kids as outdoors and active as we can. I mean, The Dad and I need them to keep up, for goodness sake! (Just kidding. Kind of.) Like most parents, we get the young'ens on neighborhood walks as early as they start walking. Sure, they just start with just a half a block at first but they slowly build their strength and interest up. I try to think of fun, engaging ways to keep their interest peaked before, during and after a walk so that they are excited for our next outing. When my oldest was in the early stages of the "pointing and naming", I brought some treasures home from a neighborhood walk and I made this simple, homemade book for her. She loved it. It taught her some outdoor vocabulary and it was one of her first experiences as a young reader of "reading" her book to Daddy.  


After our walk, I laid out all of our souvenirs to see everything had collected . It is likely you might return with 300-some odd items. (Kids love to collect!) I picked the best samples of what we had and tried for a decent variety. Once I had the final cut, I took out a piece of foam board for each treasure. Then, I cut the piece of foam to fit into a sandwich-sized baggies. 


I attached the little treasure to a piece of foam board with either glue, tape or both depending on the item.


I wrote the name of the outdoor treasure below it.  Then I put each piece of foam into it's own baggie and sealed it. 


The treasures we collected were a rock, bark, an acorn, a leaf and a stick. 


For this book, I poked holes right underneath the sealing strip of the baggies and then looped string through the holes. I tied them tightly and PRESTO! A homemade book! 


We only read this book over and over. It didn't take long before Big Sister was reading this one on her own. 


Thank you so much for reading!